The first time I had these salmon tartare cornets was at The French Laundry. This is the second time I have made this dish and it is absolutely worth the effort! Technically it is not very difficult but requires some patience. It is definitely a wow dish for company.
In The French Laundry Cookbook, Thomas Keller suggests that you make the crackers into cornets and scoop salmon tartare in there to make it look like an ice cream cone. I had it that way at the French Laundry, and it was indeed adorable. It looks like this:

However, it is beyond my patience to make mini savory cones, so I made them into crackers instead. I found this blogger named Carol a few years back on her blog, French Laundry At Home, where she cooks through the French Laundry cookbook. You can check out
how she made the salmon tartare cornets.
I believe she suffered some burns on her fingers when she was trying to form the crackers around the metal cornet mold, which further convinced me to skip that part of the recipe. I may be convinced to try it again if I can find silicone, not metal, molds. \
Some key points in the recipe that you should definitely follow and not skip (I'm serious!):
- Make sure to use the white pepper and all the seasonings as described.
- If you don't have lemon oil, it's ok - I used vegetable oil and some lemon juice at the very end right before serving. But you can find lemon oil or lemon infused olive oil at good grocers or at Rainbow (if you're in SF).
- Dice all the vegetables as tiny as you can.
- Soak the onions in water for as long as you can before adding to the creme fraiche.
- Assemble right before eating so the crackers do not get soggy.
My crackers turn out super buttery, which is mostly great, but they wanted to slip off the Silpat! For next time I am going to investigate whether I can use less butter.
Here goes the recipe:
Cornets
1/4 cup plus 3 tablespoons all purpose flour
1 tablespoon plus 1 teaspoon sugar
1 teaspoon kosher salt
8 tablespoons (4 ounces) unsalted butter, softened but still cool to the touch
2 large egg whites, cold
2 tablespoons black sesame seeds
Salmon Tartare
(makes about 3/4 cup)
4 ounces sushi grade salmon fillet (belly preferred), skin and any pin bones removed and very finely minced
3/4 teaspoon extra virgin olive oil
3/4 teaspoon lemon oil
1 1/2 teaspoon finely minced chives
1 1/2 teaspoon finely minced shallots
1/2 teaspoon kosher salt, or to taste
small pinch of freshly ground white pepper, or to taste (do not skip)
Sweet Red Onion Creme Fraiche
1 tablespoon finely minced red onions
1/2 cup crème fraiche
1/4 teaspoon kosher salt, or to taste
freshly ground white pepper to taste
24 chive tips (about 1 inch long)
For the Cornets:Thomas Keller's instructions:In a medium bowl, mix together the flour, sugar and salt. In a separate bowl, whisk the softened butter until it is completely smooth and mayonnaise-like in texture. Using a stiff spatula or spoon, beat the egg whites into the dry ingredients until completely incorporated and smooth. Whisk in the softened butter by thirds, scraping the sides of the bowl as necessary and whisking until the batter is creamy and without any lumps. Transfer the batter to a smaller container, as it will be easier to work with.
What I did:Put everything in a small food processor and pulse until combined. Works just fine. I saw him do this on TV in some random clip he did before he reached his current fame.
And then:Preheat the oven to 400 degrees F.
Make a 4-inch hollow circular stencil. Place Silpat on the counter (it is easier to work on the Silpat before it is put on the sheet pan). Place the stencil in one corner of the sheet and, holding the stencil flat against the Silpat, scoop some of the batter onto the back of an offset spatula and spread it in an even layer over the stencil. Then run the spatula over the entire stencil to remove any excess batter. After baking the first batch of cornets, you will be able to judge the correct thickness. You may need a little more or less batter to adjust the thickness of the cornets.
About the stencil:I just used an old folder and traced circles on it. I cut out the circles and taped up the sides.
There should not be any holes in the batter. Lift the stencil and repeat the process to make as many rounds as you have molds or to fill the Silpat, leaving about 1 1/2 inches between the cornets. Sprinkle each cornet with a pinch of black sesame seeds.
Place the Silpat on a heavy baking sheet and bake for 4 to 6 minutes, or until the batter is set and you see it rippling from the heat. The cornets may have browned in some areas, but they will not be evenly browned at this point.
If you are ambitious and want to make them into cornets (cones), follow these instructions:Open the oven door and place the baking sheet on the door. This will help keep the cornets warm as you roll them and prevent them from becoming too stiff to roll. Flip a cornet over on the sheet pan, sesame seed side down and place 4-1/2 inch cornet mold at the bottom of the round. If you are right-handed, you will want the pointed end on your left and the open end on your right. The tip of the mold should touch the lower left edge (at about 7 o'clock on a clock face) of the cornet.
Fold the bottom of the cornet and around the mold; it should remain on the sheet pan as you roll. Leave the cornet wrapped around the mold and continue to roll the cornets around molds; as you proceed, arrange the rolled cornets, seams side down, on the sheet pan so they lean against each other, to prevent from rolling.
When all the cornets are rolled, return them to the oven shelf, close the door, and bake for an additional 3 to 4 minutes to set the seams and color the cornets a golden brown. If the color is uneven, stand the cornets on end for a minute or so more, until the color is even. Remove the cornets from the oven and allow to cool just slightly, 30 seconds or so.
Gently remove the cornets from the molds and cool for several minutes on paper towels.
If you're not making cornets and you decided to make them into crackers like I did, just bake for about 6-8 minutes until golden brown, remove the batch onto a cookie rack. It will look kind of like this, not really pretty but it doesn't matter because the salmon will cover it up: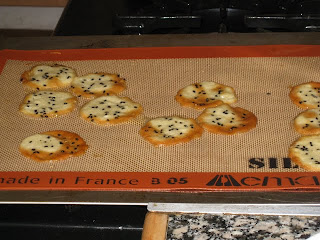 Then continue here:
Remove the Silpat from the baking sheet, wipe the excess butter from it, and allow it to cool down before spreading the next batch. Store the cornets for up to 2 days (for maximum flavor) in an airtight container.
For Salmon Tartare: With a sharp knife, finely mince the salmon fillet (do not use a food processor, as it would damage the texture of the fish) and place it in a small bowl. Stir in the remaining ingredients and taste for seasoning. Cover the bowl and refrigerate the tartare for at least 30 minutes, or up to 12 hours.
For Sweet Red Onion Crème Fraiche:Place the red onions in a small strainer and rinse them under cold water for several seconds. (Because I don't like onions, I actually soaked them in ice water for about two hours). Dry them on paper towels. In a small metal bowl, whisk the crème fraiche for about 30 seconds to 1 minute, or until it holds soft peaks when you lift the whisk. Fold in the chopped onions and season to taste with the salt and white pepper. Transfer the onion cream to a container, cover, and refrigerate until ready to serve of for up to 6 hours.
To Complete:If you made the fancy cornets:Fill just the top 1/2 inch of each cornet with onion cream, leaving the bottom of the cone empty. (This is easily done using a pastry bag fitted with a 1/4-inch plain tip or with the tip of a small knife.) Spoon about 1-1/2 teaspoons of the tartare over the onion cream and mold it into a dome resembling a scoop of ice cream. Lay a chive tip against one side of the tartare to garnish.
If you made the crackers like me:Top each cracker with 1.5 teaspoons of the tartare, top with onion cream, lay a chive tip on the onion cream.
A closeup:

Eat immediately!

 2. Heat a large nonstick skillet over medium heat. Add 1 teaspoon canola oil to pan, and swirl to coat. Add onion and celery; cook 5 minutes or until tender, stirring occasionally. Remove from heat; cool slightly.