Sunday, May 9, 2010

Nicole's Pizza!


My friend Nicole is very talented at creating healthy but yummy recipes. I tried one of them out today, and I encourage you to do the same!

Veggie-filled "Pizza"

Red pepper sauce:
3 red peppers
3 cloves garlic
olive oil
1/2 a yellow onion, chopped
1 c chicken stock
salt and pepper

'Crust':
1 1/2 cups finely-shredded cabbage
2 tbs whole grain flour (whatever you've got)
1/2 cup chopped onion or shallot
salt and pepper to taste
2 egg whites

To make sauce: Lightly oil whole peppers, then broil them until the skin is blackened in most places. Remove from oven and put in plastic bag - allow to sweat for about 45 minutes. Once cooled, remove skin (this should be easy), then take out seeds and chop roughly. Heat olive oil in a high-sided skillet. Add garlic, onion, salt'n'pepper and cook for 5 minutes, then add red pepper and continue to cook another 5 minutes or so (until onions are softened). Puree in food processor, then return to pan and add chicken stock. Cook down to desired thickness (add more stock if necessary).

To make crust: combine cabbage and onion in a bowl - make sure they're reasonably dry. Add flour, salt and pepper and combine. Then add egg. Pour olive oil in skillet and heat, then press crust mixture into pan. Saute for 6-8 minutes each side, until a nice golden brown.

Spread crust with red pepper sauce and desired toppings (suggestions: turkey italian sausage or meatballs, roasted garlic, sauteed mushrooms, spinach), then sprinkle with grated pecorino romano or parmigiano reggiano. Broil for a few minutes until cheese is melted. Cut into slices. Voila!

Monday, April 19, 2010

I WON!

This past Saturday, my friend Tobin had his annual cooking competition/birthday party. Last year the theme was pork, and I lost by a small margin. This year the theme was chicken, and I was determined to win! I started preparing the dishes on Thursday night, and spent all day Saturday cooking. I thought I would share my winning dishes with you.

Here I am with the trophy:


Drunken Chicken over Hainanese Rice:

(Drunken Chicken recipe courtesy of RasaMalaysia)

3 lbs chicken, dark meat preferably
2 Tbsp salt
1/4 tsp ground black pepper
1/4 tsp ground white pepper
0.5 oz. ginger, thinly sliced
4 – 6 green onion, white parts only, sliced lengthwise
1 1/2 C Shaoxing rice wine
2 tsp white sugar

Ice cubes and water

Method:

Mix the salt with the two peppers. Rub the chicken all over with the salt and pepper and let it sit for an hour.

Poaching Method:

Bring 6 cups of water to a boil in a Dutch oven or large pot, add the green onion bottoms and ginger. Add the chicken, make sure there is enough water to cover the chicken, and return to a boil. Lower the heat to a bare simmer and simmer for 10 minutes. If you’re using a whole chicken, when the water is simmering for 10 minutes, lift the chicken out of the water and make sure the stock in the cavity empties back into the pot. Do that 3 times for a whole chicken. For chicken pieces or leg quarters, gently stir the pot once or redistribute the leg quarters so they cook evenly. After 10 minutes, cover, turn off the heat, and allow the chicken to poach undisturbed until the water cools almost to room temperature.

Steaming Method:

Bring water to a boil in the steamer. Place the chicken in an even layer, scatter the green onion and ginger all over and steam over medium heat for 30 – 40 minutes or until the internal temperature near the bone reaches 165 – 170 degrees F. If the chicken pieces are larger, they will take longer to steam. If any of the pieces are touching make sure to redistribute them in the middle of cooking so they cook evenly.

Mix the ice cubes and water and shock the chicken in ice cold water for 2 minutes. If you poached the chicken, shock it after the chicken has cooled to room temperature. If you steamed the chicken, shock it immediately after steaming.

After cooking, cut the chicken into bite sized pieces, or score the chicken meat with a knife. Put the chicken pieces into a large container. Mix 3/4 cup to 1 cup of the chicken stock (the liquid you poached the chicken in or the liquid that comes out of the chicken after steaming) with the sugar and rice wine. Taste the marinade and add salt if needed. Pour it over the chicken pieces and let this sit in the fridge at least overnight before serving. Serve cold.


Hainanese Rice recipe courtesy of Eugenia!

2 tablespoons unsalted butter
1 tablespoon vegetable oil
2 garlic cloves, finely minced
1 tablespoon ginger, finely minced

2 cups of short grain Japanese rice
3 cups organic chicken stock (I use Pacific Brand from Whole Foods)
1/2 of a pork boullion cube

In a medium stock pot over medium heat, melt butter with vegetable oil. Add the garlic and ginger, stir until fragrant but not burnt. Add the rice to the mixture and cook over medium heat, stirring constantly until some of the rice is a little brown and toasted.

Add 3 cups of warm chicken stock to the pot and the half of pork boullion cube. Cover tightly and turn the heat down to a bare simmer. Cook undisturbed (don't peek!) for 25 minutes.

Fluff it up with a fork and serve.

Fried Bacon Wrapped Drumsticks with Honey Peach Glaze:

My second recipe was an altered version of Alton Brown's fried chicken recipe. I came up with the honey peach glaze recipe on my own, with a little inspiration from an item on the Rockwood Room Menu:

  • One family pack of drumsticks (12-14 drumsticks)
  • Two packs of bacon
  • toothpicks
  • 1/2 gallon of low fat buttermilk
  • 1 tablespoons kosher salt
  • 2 tablespoons Hungarian paprika
  • 2 teaspoons garlic powder
  • 1 teaspoon cayenne pepper
  • Flour, for dredging
  • Vegetable shortening, for frying

Directions

Wrap each drumstick with bacon and pin in place with toothpicks. Place chicken pieces into a plastic container and cover with buttermilk. Cover and refrigerate for 12 to 24 hours.

Melt enough shortening (over low heat) to come halfway up the side of a 12-inch cast iron skillet or heavy fry pan. Once shortening liquefies raise heat to 325 degrees F. Do not allow oil to go over 325 degrees F.

Drain chicken in a colander. Combine salt, paprika, garlic powder, and cayenne pepper. Liberally season chicken with this mixture. Dredge chicken in flour and shake off excess. Leave chicken be for ten minutes then dredge in flour again. This makes them extra crispy!

Place chicken skin side down into the pan. Cook chicken until golden brown on each side, approximately 10 to 12 minutes per side. More importantly, the internal temperature should be right around 180 degrees. (Be careful to monitor shortening temperature every few minutes.)

Drain chicken on a rack over a sheet pan. Don't drain by setting chicken directly on paper towels or brown paper bags. If you need to hold the chicken before serving, cover loosely with foil but avoid holding in a warm oven, especially if it's a gas oven.

Honey Peach Glaze:

Peach glaze can be served on the side or spooned directly over the chicken! Peach glaze modified from Food Network recipe.

Ingredients:

  • 1/2 cup onion, finely chopped
  • Two fresh and ripe peaches, chopped
  • 2 tablespoons honey
  • 1 teaspoon Worcestershire sauce
  • 1 tablespoon brown sugar

In a small saucepan, saute onions in oil until softened. Add peaches, honey, Worcestershire sauce, brown sugar and ground pepper. Bring to a boil. Lower to a simmer and cook until peaches break down and glaze thickens, about 20-30 minutes.

Tuesday, January 19, 2010

Ratatouille for Lunch


Anna and Lilah came by yesterday for lunch. I can only have one friend who is a vegetarian and doesn't drink, and Anna has taken up both slots! If she wasn't so nice and sweet I would have sneaked some bacon grease into the veggies but I made an entirely vegetarian lunch that was actually really delicious and contained no fake products (I absolutely hate fake meat or fake whatever foods).
Ratatouille (Adapted from Nandita's recipe. Thanks, Nandy!)
Ingredients:
For the sauce:
  • ~4 tomatoes (peeled, w/o seeds, chopped - you can use seeded chopped CANNED tomatoes in a pinch)
  • ~3-4 garlic cloves (minced or sliced)
  • a nice handful of Italian parsley (chopped)
  • ~2 twiggys of fresh thyme, chopped
  • ~8-9 fresh basil leaves (rough cut -- i.e. not too small)
  • at least 1/4 c olive oil (you can use more if you want. Use a good quality olive oil like Brianna - something you'd eat with your bread)
For the dish:
  • 2 eggplants (about 2 lbs), sliced into 1/2 inch slices. Japanese eggplant work well but regular eggplants are fine also.
  • 2 red bell peppers, seeded and cut into 4-6 slices
  • 2 yellow bell peppers, seeded and cut into 4-6 slices
  • 1 large yellow onion, thinly sliced
  • 1 teaspoon of chopped fresh thyme and/or rosemary
  • Olive oil
  • Salt and Pepper
Preheat oven to 350 F.
First you'll need to prep the egg plant: sprinkle salt over both side of the eggplant slices and lay them flat on top of two layers of paper towel, or a large colander if you have one. Let the eggplant sit for at least half hour to 45 minutes, until moisture comes out of the eggplant slices. Rinse the eggplant slices and squeeze dry between two paper towels. Set aside.
Then you'll make the sauce: In a medium sauce pan over medium heat, heat the olive oil (1/4 cup) until warm. Add the garlic, sautee until cooked, then add the tomatoes, parsley, thyme, basil, simmer until thickened, about 15 minutes.
Meanwhile: sautee the bell peppers in 1 tablespoon of olive oil and a sprinkle of salt. Set aside. sautee the onion slices until translucent and soft, salt to taste, set aside. Sautee the eggplant slices in 3 tablespoons of olive oil (add more if needed) - you may need to do this in batches. The eggplant slices are done when they are soft and golden brown. Set aside.
To assemble: layer some onions on the bottom of the dish. Then put a layer of the bell peppers, then eggplant slices, and some of the tomatoe sauce. Sprinkle a little salt and the herb mixture. Repeat until you fill the casserole dish. Bake for about 45 minutes until bubbly.
Quinoa Pilaf
Ingredients:
  • 1/2 cup carrots, finely diced
  • half an onion, finely diced
  • a cup of mushrooms, sliced
  • 1 tablespoons olive oil or butter
  • 1 cup quinoa, rinsed in a colander through several changes of water
  • 1 3/4 cup hot water or vegetable broth
Place the oil in a medium deep skillet or sauce pan and turn the heat to medium. A minute later, add the onion and carrots and sautee untl soften, about 5 minutes. Add the quinoa and cook, stirring, for at least 5-6 minutes (important - this toasts the quinoa and gives it a good flavor).
Then add the liquid and mushroom slices all at once. Cover and cook until quinoa is tender, about 15 minutes. If all the liquid has been absorbed and quinoa is not tender, you can add a little more (1/4 cup) of water and continue to cook until tender.
White bean salad
Ingredients:
  • 3 cups cooked or canned white beans (I used a mixture of canned cannelini beans and black eyed peas. I also rinsed them before using.)
  • 1 teaspoon fresh thyme, chopped
  • 1 teaspoon fresh marjoran, chopped
  • 3 scallions, thinly sliced
  • 1/4 cup minced red bell pepper
  • 6 Tablepoons olive oil
  • 2-3 tablespoons red wine vinegar (can also use sherry vinegar or balsamic)
  • 1/2 teaspoon dijon mustard
  • salt and pepper
Cook beans with half the thyme for 5 minutes until heated through. Turn off the heat. Add the scallions and red peppers, and cool. In a bowl, whisk olive oil, red wine vinegar, and mustard until emulsified. Add salt, pepper, or additional oil or vinegar to taste. Pour the dressing over the bean mixture and marinate for an hour or up to 24 hours.
I marinated it overnight and served it on top of a bed of arugula that was tossed with a little oil and vinegar.

Saturday, October 24, 2009

Seafood Cakes with Mustard Crema


Once again, this recipe is from my friend Dawn's seafood cooking party. The seafood cakes recipe is actually from a magazine called Cooking Light, but it's so delicious that it doesn't taste like "diet" food at all. I think a big part of that is probably owing to the fact that Matt, who was responsible for making this dish, bought fresh real crab meat from Whole Foods. An expensive but worthwhile investment since the crab meat is the star of the dish.

Dawn's six-burner semi-professional stove range browned the seafood cakes perfectly, as you will soon see below! The mustard crema sauce was really delicious (be sure to get coarse grain mustard and use fresh herbs). I think I'll be using that sauce on other seafood dishes as well. If you like sauce, I would double the sauce recipe.

Ingredients

* 1/3 cup light sour cream
* 6 tablespoons chopped fresh parsley, divided
* 1 tablespoon stone-ground mustard
* 1/2 teaspoon black pepper, divided
* 7 teaspoons canola oil, divided
* 1/4 cup finely chopped red onion
* 1/4 cup finely chopped celery
* 8 ounces peeled and deveined medium shrimp, chopped
* 8 ounces lump crabmeat, drained and shell pieces removed
* 1/4 cup (1 ounce) grated fresh Parmigiano-Reggiano cheese
* 1/4 teaspoon salt
* 2 large egg whites, lightly beaten
* 1 large egg, lightly beaten
* 1 cup panko (Japanese breadcrumbs)

Preparation

1. Combine sour cream, 2 tablespoons parsley, mustard, and 1/8 teaspoon pepper, stirring with a whisk until blended. Set aside.

Here is Matt chopping all the ingredients:

2. Heat a large nonstick skillet over medium heat. Add 1 teaspoon canola oil to pan, and swirl to coat. Add onion and celery; cook 5 minutes or until tender, stirring occasionally. Remove from heat; cool slightly.

3. Combine shrimp and crab in a large bowl. Stir in onion mixture, remaining pepper, remaining 1/4 cup parsley, cheese, salt, egg whites, and egg; stir gently. Add panko; stir gently. Divide mixture into 8 equal portions; flatten to 1/2-inch-thick patties.

Like this:

4. Heat skillet over medium-high heat. Add remaining 2 tablespoons oil to pan; swirl to coat. Add patties to pan; cook 3 minutes or until lightly browned.


Carefully turn over; cook 3 minutes or until done. Serve with sauce

Friday, October 23, 2009

Salmon Tartare a la The French Laundry


The first time I had these salmon tartare cornets was at The French Laundry. This is the second time I have made this dish and it is absolutely worth the effort! Technically it is not very difficult but requires some patience. It is definitely a wow dish for company.

In The French Laundry Cookbook, Thomas Keller suggests that you make the crackers into cornets and scoop salmon tartare in there to make it look like an ice cream cone. I had it that way at the French Laundry, and it was indeed adorable. It looks like this:


However, it is beyond my patience to make mini savory cones, so I made them into crackers instead. I found this blogger named Carol a few years back on her blog, French Laundry At Home, where she cooks through the French Laundry cookbook. You can check out how she made the salmon tartare cornets.

I believe she suffered some burns on her fingers when she was trying to form the crackers around the metal cornet mold, which further convinced me to skip that part of the recipe. I may be convinced to try it again if I can find silicone, not metal, molds. \

Some key points in the recipe that you should definitely follow and not skip (I'm serious!):
- Make sure to use the white pepper and all the seasonings as described.
- If you don't have lemon oil, it's ok - I used vegetable oil and some lemon juice at the very end right before serving. But you can find lemon oil or lemon infused olive oil at good grocers or at Rainbow (if you're in SF).
- Dice all the vegetables as tiny as you can.
- Soak the onions in water for as long as you can before adding to the creme fraiche.
- Assemble right before eating so the crackers do not get soggy.

My crackers turn out super buttery, which is mostly great, but they wanted to slip off the Silpat! For next time I am going to investigate whether I can use less butter.

Here goes the recipe:

Cornets

1/4 cup plus 3 tablespoons all purpose flour
1 tablespoon plus 1 teaspoon sugar
1 teaspoon kosher salt
8 tablespoons (4 ounces) unsalted butter, softened but still cool to the touch
2 large egg whites, cold
2 tablespoons black sesame seeds

Salmon Tartare
(makes about 3/4 cup)

4 ounces sushi grade salmon fillet (belly preferred), skin and any pin bones removed and very finely minced
3/4 teaspoon extra virgin olive oil
3/4 teaspoon lemon oil
1 1/2 teaspoon finely minced chives
1 1/2 teaspoon finely minced shallots
1/2 teaspoon kosher salt, or to taste
small pinch of freshly ground white pepper, or to taste (do not skip)

Sweet Red Onion Creme Fraiche

1 tablespoon finely minced red onions
1/2 cup crème fraiche
1/4 teaspoon kosher salt, or to taste
freshly ground white pepper to taste
24 chive tips (about 1 inch long)


For the Cornets:
Thomas Keller's instructions:
In a medium bowl, mix together the flour, sugar and salt. In a separate bowl, whisk the softened butter until it is completely smooth and mayonnaise-like in texture. Using a stiff spatula or spoon, beat the egg whites into the dry ingredients until completely incorporated and smooth. Whisk in the softened butter by thirds, scraping the sides of the bowl as necessary and whisking until the batter is creamy and without any lumps. Transfer the batter to a smaller container, as it will be easier to work with.

What I did:
Put everything in a small food processor and pulse until combined. Works just fine. I saw him do this on TV in some random clip he did before he reached his current fame.

And then:

Preheat the oven to 400 degrees F.

Make a 4-inch hollow circular stencil. Place Silpat on the counter (it is easier to work on the Silpat before it is put on the sheet pan). Place the stencil in one corner of the sheet and, holding the stencil flat against the Silpat, scoop some of the batter onto the back of an offset spatula and spread it in an even layer over the stencil. Then run the spatula over the entire stencil to remove any excess batter. After baking the first batch of cornets, you will be able to judge the correct thickness. You may need a little more or less batter to adjust the thickness of the cornets.

About the stencil:
I just used an old folder and traced circles on it. I cut out the circles and taped up the sides.

There should not be any holes in the batter. Lift the stencil and repeat the process to make as many rounds as you have molds or to fill the Silpat, leaving about 1 1/2 inches between the cornets. Sprinkle each cornet with a pinch of black sesame seeds.

Place the Silpat on a heavy baking sheet and bake for 4 to 6 minutes, or until the batter is set and you see it rippling from the heat. The cornets may have browned in some areas, but they will not be evenly browned at this point.

If you are ambitious and want to make them into cornets (cones), follow these instructions:
Open the oven door and place the baking sheet on the door. This will help keep the cornets warm as you roll them and prevent them from becoming too stiff to roll. Flip a cornet over on the sheet pan, sesame seed side down and place 4-1/2 inch cornet mold at the bottom of the round. If you are right-handed, you will want the pointed end on your left and the open end on your right. The tip of the mold should touch the lower left edge (at about 7 o'clock on a clock face) of the cornet.

Fold the bottom of the cornet and around the mold; it should remain on the sheet pan as you roll. Leave the cornet wrapped around the mold and continue to roll the cornets around molds; as you proceed, arrange the rolled cornets, seams side down, on the sheet pan so they lean against each other, to prevent from rolling.

When all the cornets are rolled, return them to the oven shelf, close the door, and bake for an additional 3 to 4 minutes to set the seams and color the cornets a golden brown. If the color is uneven, stand the cornets on end for a minute or so more, until the color is even. Remove the cornets from the oven and allow to cool just slightly, 30 seconds or so.

Gently remove the cornets from the molds and cool for several minutes on paper towels.

If you're not making cornets and you decided to make them into crackers like I did, just bake for about 6-8 minutes until golden brown, remove the batch onto a cookie rack. It will look kind of like this, not really pretty but it doesn't matter because the salmon will cover it up:
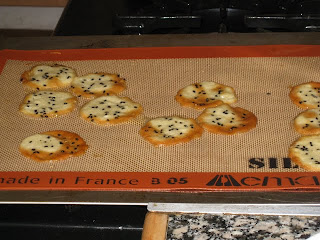


Then continue here:
Remove the Silpat from the baking sheet, wipe the excess butter from it, and allow it to cool down before spreading the next batch. Store the cornets for up to 2 days (for maximum flavor) in an airtight container.

For Salmon Tartare:
With a sharp knife, finely mince the salmon fillet (do not use a food processor, as it would damage the texture of the fish) and place it in a small bowl. Stir in the remaining ingredients and taste for seasoning. Cover the bowl and refrigerate the tartare for at least 30 minutes, or up to 12 hours.

For Sweet Red Onion Crème Fraiche:
Place the red onions in a small strainer and rinse them under cold water for several seconds. (Because I don't like onions, I actually soaked them in ice water for about two hours). Dry them on paper towels. In a small metal bowl, whisk the crème fraiche for about 30 seconds to 1 minute, or until it holds soft peaks when you lift the whisk. Fold in the chopped onions and season to taste with the salt and white pepper. Transfer the onion cream to a container, cover, and refrigerate until ready to serve of for up to 6 hours.

To Complete:
If you made the fancy cornets:
Fill just the top 1/2 inch of each cornet with onion cream, leaving the bottom of the cone empty. (This is easily done using a pastry bag fitted with a 1/4-inch plain tip or with the tip of a small knife.) Spoon about 1-1/2 teaspoons of the tartare over the onion cream and mold it into a dome resembling a scoop of ice cream. Lay a chive tip against one side of the tartare to garnish.

If you made the crackers like me:
Top each cracker with 1.5 teaspoons of the tartare, top with onion cream, lay a chive tip on the onion cream.

A closeup:


Eat immediately!

Lemon Squares by America's Best Test Kitchen

lemon bar porn (1 of 2)

America's Best Test Kitchen is one of my trusted kitchen bibles. Just about every recipe I've tried there has worked out well, probably because the recipes have gone through so much testing!

My new favorite is their lemon squares. The lemon part is really custardy, and the crust is super easy to make. The only thing is that it is a bit tricky to build up the crust since it is so dry and crumbly when you blend it in the food processor (I have also tried the alternative method of grating frozen butter into the dry ingredients. Works wonderfully. Genius, really).

Ingredients
The Crust

1 3/4 cups all-purpose flour
2/3 cup confectioners’ sugar
1/4 cup cornstarch
3/4 teaspoon salt
12 tablespoons unsalted butter -- (1 1/2 sticks) at
very cool room temperature, cut into 1-inch pieces, plus extra for greasing pan

The Filling
4 large eggs — beaten lightly
1 1/3 cups granulated sugar
3 tablespoons all-purpose flour
2 teaspoons finely grated zest — (from two large
lemons)
2/3 cup fresh lemon juice — (from 3 to 4 large
lemons), strained
1/3 cup whole milk
1/8 teaspoon salt


Directions

1. For the crust: Adjust oven rack to middle position and heat oven to 350 degrees. Lightly butter a 13-by-9-inch baking dish and line with one sheet parchment or wax paper. Dot paper with butter, then lay second sheet crosswise over it.

2. Pulse flour, confectioners’ sugar, cornstarch, and salt in food processor workbowl fitted with steel blade. Add butter and process to blend, 8 to 10 seconds, then pulse until mixture is pale yellow and resembles coarse meal, about three 1-second bursts. Sprinkle mixture into lined pan and press firmly with fingers into even, 1/4-inch layer over entire pan bottom and about 1/2 inch up sides. Refrigerate for 30 minutes, then bake until golden brown, about 20 minutes. (I had to bake for an additional 10 minutes to make sure the crust is really golden brown. Otherwise it will taste raw).

(If you do not have a food processor, combine the dry ingredients in a big bowl, grate frozen butter over the large hole setting of your grater over the dry ingredients, toss to combine with your fingers)

3. For the filling: Meanwhile, whisk eggs, sugar, and flour in medium bowl, then stir in lemon juice, zest, milk, and salt to blend well.

4. To finish the bars: Reduce oven temperature to 325 degrees. Stir filling mixture to reblend; pour into warm crust. Bake until filling feels firm when touched lightly, about 20 minutes. Transfer pan to wire rack; cool to near room temperature, at least 30 minutes. Transfer to cutting board, fold paper down, and cut into serving-size bars, wiping knife or pizza cutter clean between cuts, as necessary. Sieve confectioners’ sugar over bars, if desired.

This is pretty good at room temperature and some say even better chilled!

Jambalaya by Tom!


We're really lucky to have a guest chef on Our Family Kitchen - Aaron's pops, Tom! The other day I was in the mood for something from the South and knew that the only person I should ask for a recipe was Tom.

For my first foray into Southern cooking, Tom suggested that I make a jambalaya. His recipe makes for a lot, and at first I was a little puzzled by the steps that were unfamiliar to me (cooking the shrimp in the rice? stewing the sauce for an hour? The enormous amount of onions used?). Well I should have known to never doubt Tom's recipe! I made the dish exactly as prescribed and it was just perfect. Here it goes:


Jambalaya by Tom (with my notes)

Ingredients

3 large onion, chopped
2 bell peppers, chopped
1 cup of oil
1 8-ounce can of tomato sauce
1 6-ounce can of tomato paste
1/2 cup of chopped green onion tops
1/2 cup of chpped parsley
2 cloves of garlic, minced
6 cups of water
5 teaspoons of salt
black pepper and cayenne pepper to your taste (remember you want it to be a little tingly, but not burning hot)
2 bay leaves
4 cups of raw rice (I used Basmati rice)
2 pounds of peeled and deveined shrimp (use 2 lb if you are only using shrimp. For mine I use 1 lb shrimp, 1 lb chicken, 1.5 lb andouille sausage)


Steps:

1. Saute onions and bell pepper in oil over low heat until onions are transparent; add tomato sauce and tomato paste and cook on low heat for one hour.

(Meanwhile I marinated 1 lb chicken thigh pieces in lemon juice, salt, and pepper. I browned the chicken pieces. I also browned the andouille sausage and sliced them)

2. Add remaining ingredients, stir well and bring to a boil; pour into a greased baking dish, cover and bake at 300 degrees F for one hour or until rice is cooked

3. The final product should not be wet; more of the consistency of mashed potatoes, if you get my drift.

4. If you're into white whines, a good Italian Orvietto goes well, but you can also serve it with hearty red wines (a good petite syrah like Spellbound is a good compliment).

5. Serve with a nice green salad, balsamic vinegrette dressing